
What is the first thing that comes to your mind when you hear about Google Analytics?
For most people, it probably has something to do with Search Engine Optimisation (SEO), but did you know that next to that, Google Analytics (GA) also holds tons of insights into how you can create better content for your business?
To save time and money for your company, don’t you think it would be better if you could create better content instead of more content?
Better content that could help you rank better for the search terms that you want to be found for? Instead of just trying to create as much content as possible, hoping you eventually will rank?
However, there are dozens of different ways to slice and dice all the information available in Google Analytics to come up with killer content ideas.
To help you get the most out of your valuable time and to help guide you to improve your content marketing, this post will help you set up your Google Analytics, teaches you the most common terminology you need to navigate through all the reports, and help get the most out of your content marketing.
First, let’s figure out why you should take the time to learn and use Google Analytics for your Content Marketing.
Table of Contents
- Why is Google Analytics important for content marketing?
- Implementing Google Analytics on your site
- Google Analytics Terminology
- Turning Google Analytics into valuable, actionable information
- Setting up goals for important conversions on your site.
- Aligning your goals across the Customer Journey to what you can track
- Using Site Search
- Identifying and Filtering Internal Traffic from Google Analytics
- See which pages hold people’s attention the longest.
- Finding slow loading page to optimize your site speed
- Advanced Google Analytics reporting
Why is Google Analytics important for content marketing?
If You Can't Measure It, You Can't Improve It. - Peter DruckerClick To TweetManagement thinker Peter Drucker was right. For you to improve any part of your business, you need to be able to measure it. And what easier way to measure using a tool that offers incredible reporting features at no cost from a company that is already collecting vast amounts of data from your company and your customers?
By reading the numbers, Google Analytics can capture your business and try to figure out the story they are trying to tell you is THE best way not just to make data-informed marketing decisions but also to improve your marketing performance in general.
Let’s say, for example, you’ve got an idea for a piece of content. You assume that this is the kind of material your customers are waiting for. After all, content marketing is just solving the same problems that your product solves through the media you create and promote, right?
So you do some research online, start creating what you think is the absolute best content around the subject you’ve ever seen, and hit that publish button.
If you don’t have any analytics, your story will end just there. Your piece of content is online, and you’re hoping for the best. Maybe you would see new leads coming in, but that’s it.
By using analytics (and Google Analytics is one of the best, easy and free tools available), you would not only know if that piece of content is hitting the marks, but you can also figure out the rest of the story.
What individual pieces led up to that conversion to the people coming to your site?
It doesn’t only help you to establish your goals. It can help you to learn how to repeat the process in the most efficient ways, come up with new content topics, maybe learn how you need to make adjustments to your content, so it does hit the mark, etc.
And not only that, Google Analytics can help you answer questions like:
- How effective are my Content Marketing efforts?
- What are the pieces of content that are the least effective and turn visitors away?
- Are my efforts improving over time?
- Which types of content are most effective for converting visitors? Which types of content are most effective to build traffic?
- What are some content topics that I’m missing out on?
- What are some quick wins that I can implement?
You see, the better data you have, the more informed decisions you can make about your content marketing strategy and how to move forward.
Implementing Google Analytics on your site
Now that you know the importance of measuring your Content Marketing efforts using Google Analytics, let’s dive into the basics to help you get started.
Creating a Google Analytics account
First things first, before you can use Google Analytics, you have to set up Google Analytics on your website, of course.
If you don’t already have a Google Analytics account, you can quickly create one for free on the Google Analytics website!
To create a Google Analytics account:
- Click here to go to Google Analytics. Note: If you have a Google account, and are not signed in, click Sign in. If you do not have a Google account, click Create an account.
- Once you have signed in to your Google account, click Access Google Analytics.
- Click Sign up.
- Fill in your Account Name, Website Name, and Website URL, and select an Industry Category and Reporting Time Zone.
- Under Data Sharing Options, check the boxes next to the options that you want.
- Click Get Tracking ID.
- From the Google Analytics Terms of Service Agreement that opens, click I Accept.
- Write down the Tracking ID for setup on your website.
Installing Google Analytics using Google Tag Manager
The next thing you have to do is set up Google Analytics on your website. If you’re running WordPress like us, there are three different ways to do this:
- Implement the Tracking ID manually in your WordPress theme (only if you know how to code, ask your developer otherwise)
- Use a plugin like Monster Insights to add the basic tracking functionality to your website quickly
- Take a little longer approach by using Google Tag Manager to implement the tracking ID.
Our preference goes for the last method.
Google Tag manager not only allows you to implement Google Analytics on your website, but it also gives an easy way to deploy and manage all other marketing tags (snippets of code or tracking pixel, think Facebook Pixel, Snapchat pixel, etc.) to your website without you needing a developer at all.
So head over to Google Tag Manager and signup. The next step is creating a new account by entering an account name and location. Followed by entering the name of your website as the container name and choosing web as the place to use the container.
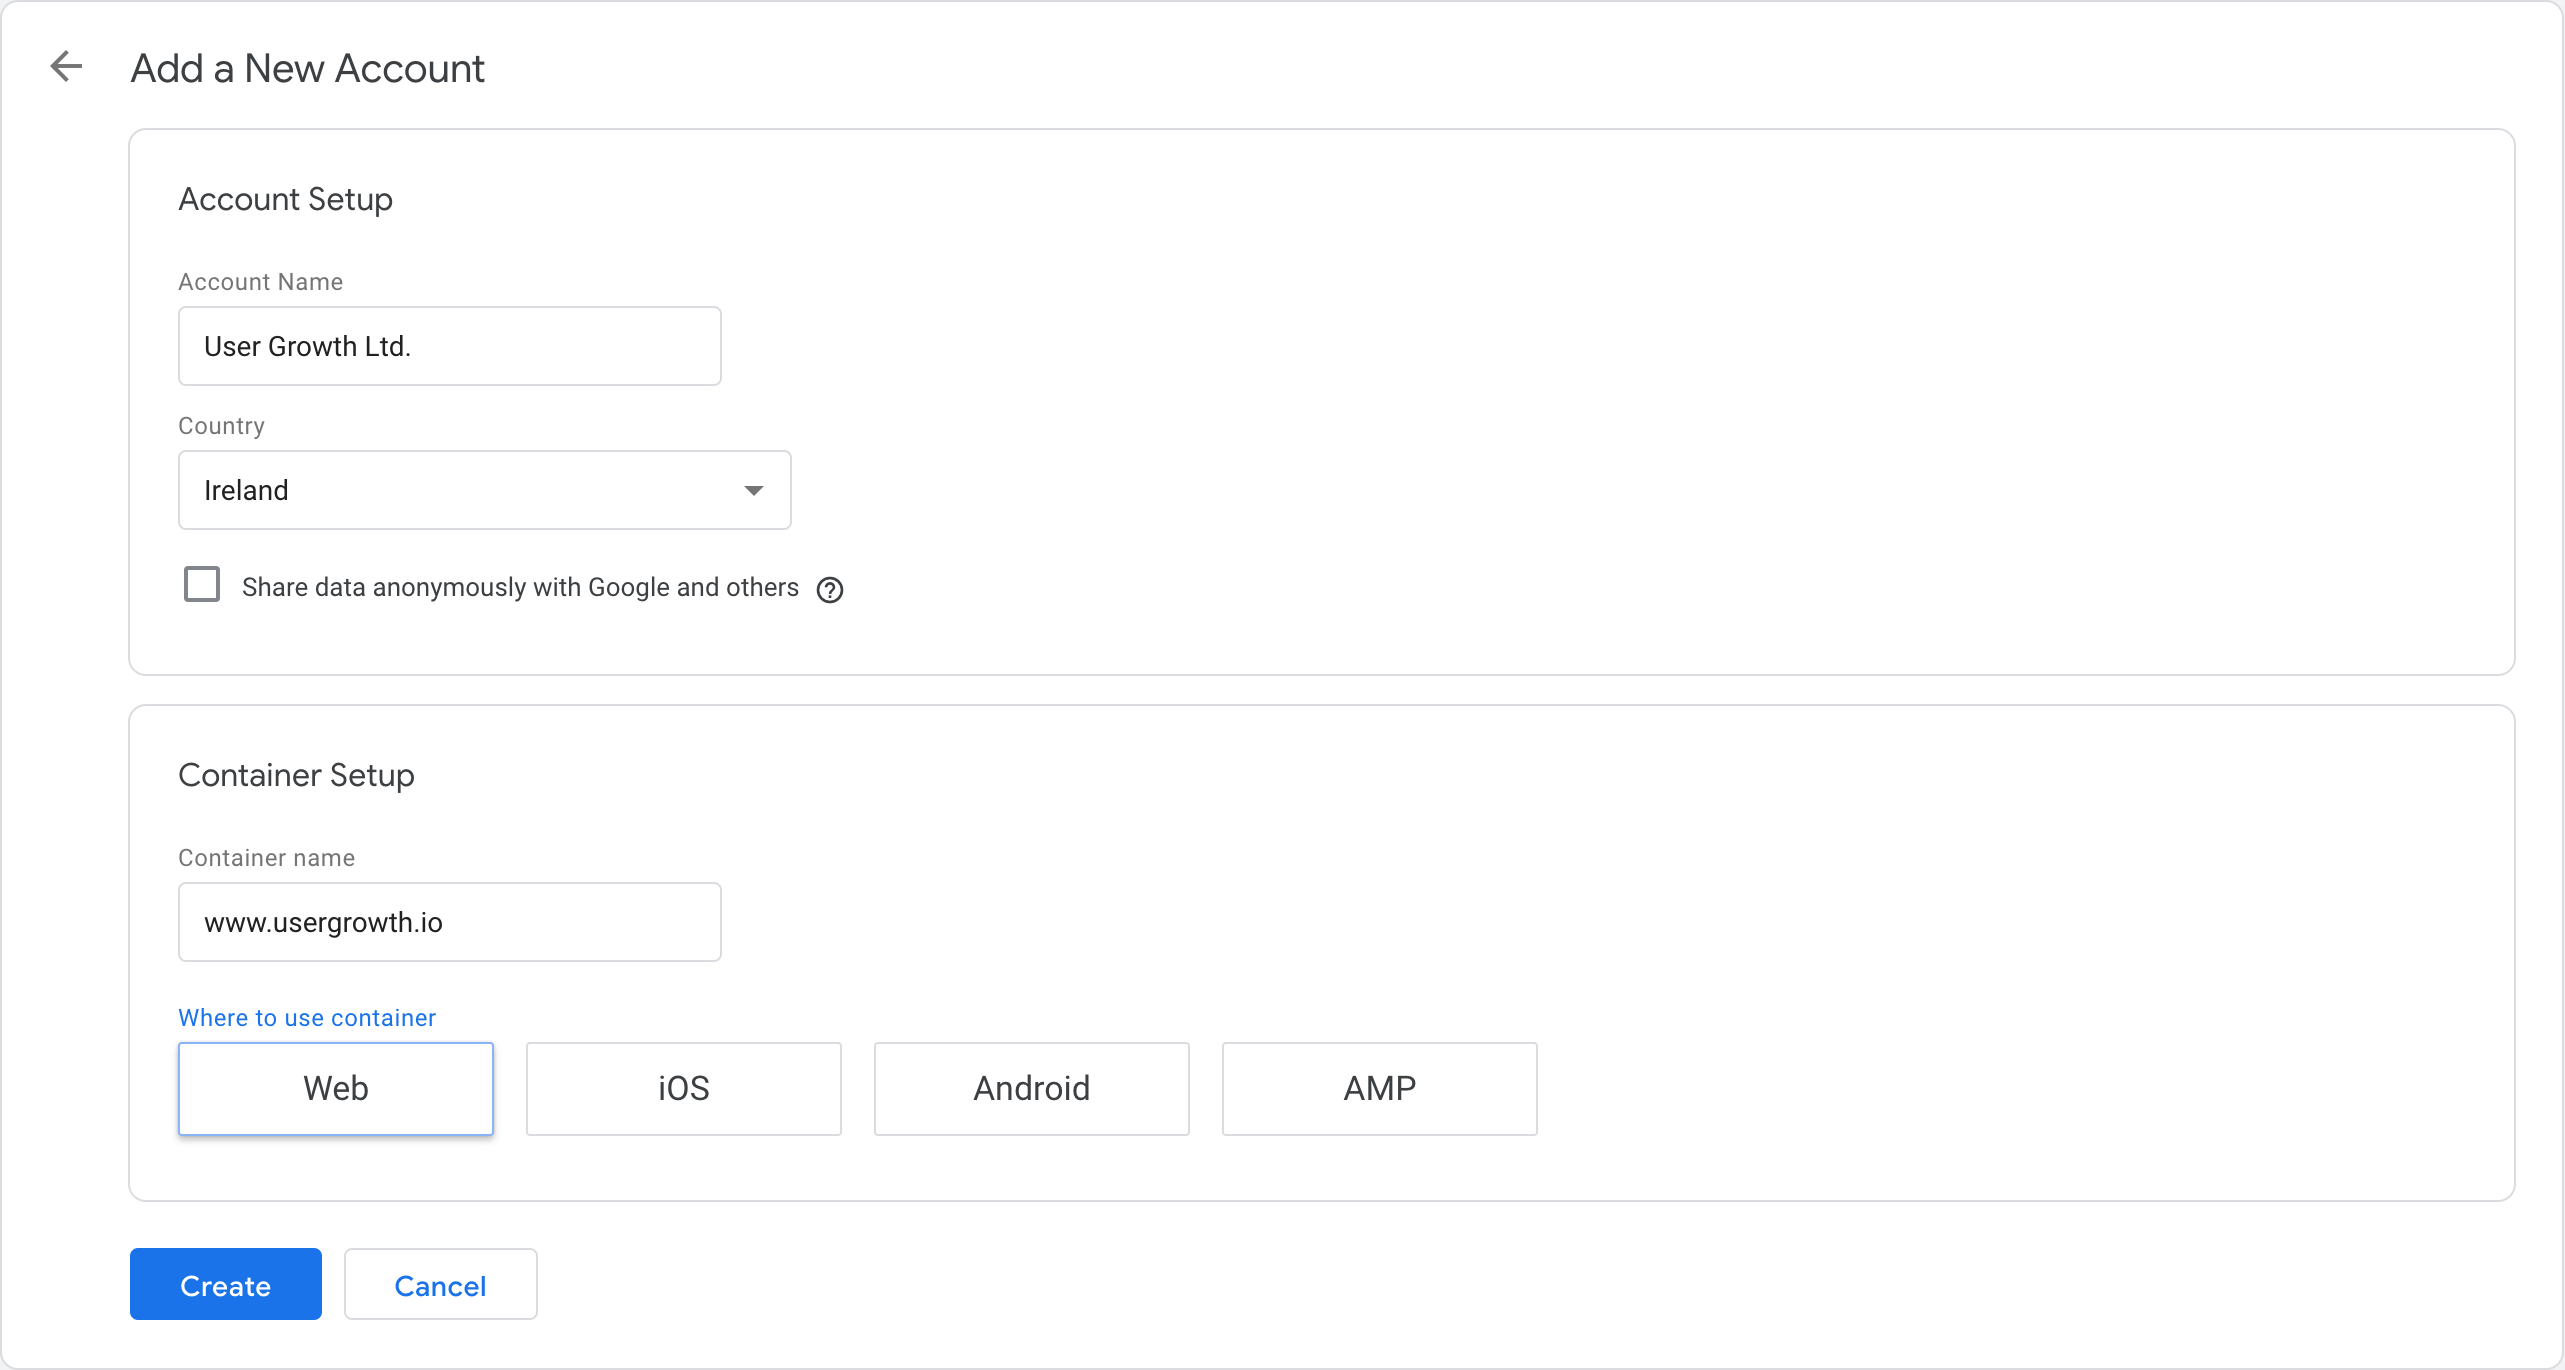
Pretty straightforward, right?
Now accept the Terms of Services of Google Tag Manager, and you’re almost good to go.
Copy the tracking snippet given to you and then, most importantly, the Google Tag Manager ID (looks like GTM-XXXXXXX).
Using the Google Tag Manager for WordPress plugin, you don’t need to edit any code. Just install the plugin and copy and paste the Google Tag Manager ID after activating the plugin and going to the settings.
Now we need to add a tag to the Google Tag Manager, do this by pressing the “New Tag” button.
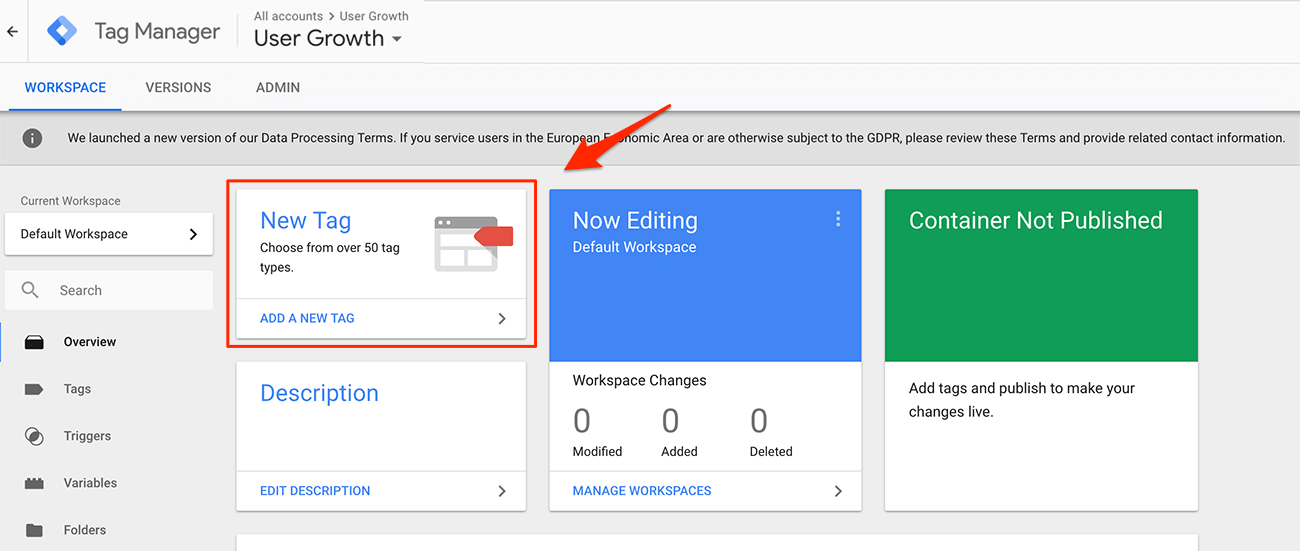
Then you need to come up with a name, so the tag is easily recognizable for future use. We suggest using “Google Analytics,” but feel free to use whatever you want.
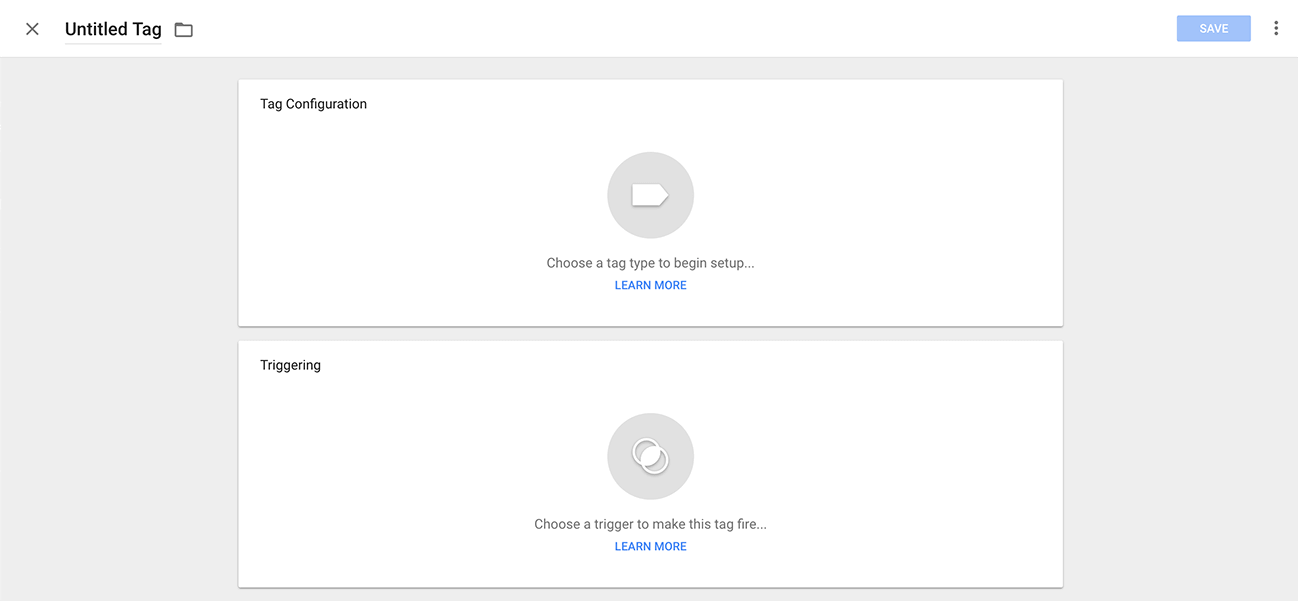
Next step, click on the big button in the “Tag Configuration” to begin the setup. There are a lot of different tags to choose from, but the first one is for “Universal Analytics”; that is the one we want.
To not go into too many details right now, you will keep the “Tracking Type” set for “Pageview,” and then you choose “New Variable…” in the Google Analytics settings.
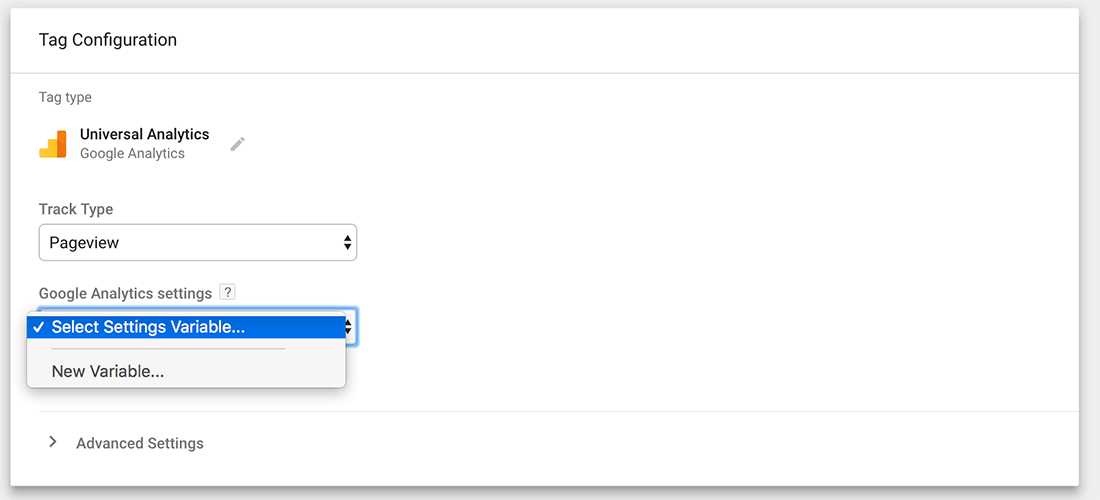
In the next screen, you can then enter your Tracking ID from the Google Analytics you set up earlier. Google Tag Manager asks you to name the variable for later use in other places. Let’s keep that name as it is.
Next, click the “Choose a trigger to make this tag fire…” button. For a basic Google Analytics implementation, select “All Pages.”
The final step now to have Google Analytics working on your website and have it execute on every page is hitting the Submit Button (top right corner):
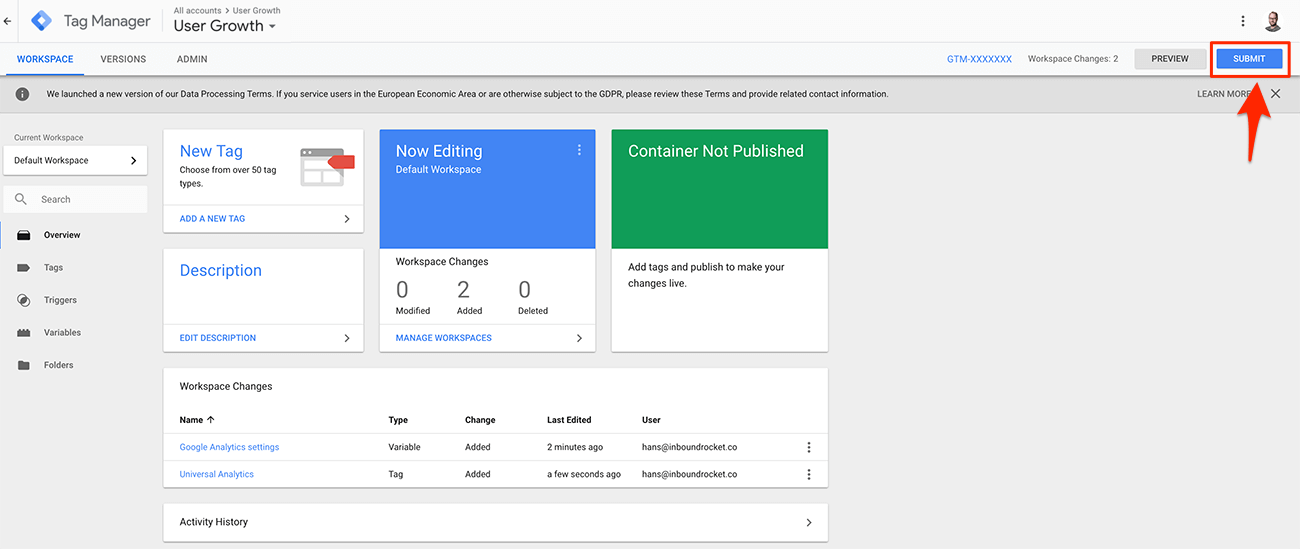
Give your changes a version name and hit publish. When Google Tag Manager for WordPress is activated with your Google Tag Manager ID, Google Analytics will now be working on your site.
Google Analytics Terminology
Before we go any deeper, let’s first get the fundamental terminology right. This way, you can better understand any reporting that Google Analytics throws at you.
What is a User within Google Analytics?
One of the first things you need to know about Google Analytics is what is considered a “user” within GA. For GA, an individual that browses your website is called a user. (If you want to get really technical, it is a unique browser cookie). It does not matter if a person visits your website only once, or multiple times. For example, one user can create five sessions on your site, and each session has numerous page views.
Since GA uses a unique cookie to identify this person, it means a user is stored in a browser. When someone visits your website using different browsers (on the same machine or different devices), GA will report more than one user.
If you want to identify one person over multiple devices/browsers, you need to use the User ID feature. A User ID is a way to combine sessions from a known person on your website. If you have a way to identify someone (by using an ID from your CRM system for example), you can send that ID to GA, which enables a unique set of cross-device reports. Of course, this works only accurately when you can identify a visitor (for example, when someone is logged into your website) and won’t work for all visitors.
What are Pageviews?
A Pageview is precisely what you think it would mean. When a User views a page on your website, this will be reported as a Pageview. By default, Google Analytics orders your pages based on the most amounts of views. This helps you to identify which content of yours is viewed more than others.
What are Unique Pageviews?
The problem with Pageviews, though is that if a User visits the same page multiple times within the same session, they are all counted as Pageviews. This means that when someone goes back to a previous page after consuming a particular piece of content that the original page is recorded twice as being viewed. Even if the only reason to go back was that they knew there was another link on there that they wanted to explore.
By looking at Unique Pageviews, every page is only counted once within a single session, even if it was viewed multiple times.
How are Pageviews combined into Sessions?
While Pageviews are interesting, it is always interesting to figure out how many Sessions there were on your website. When someone starts on an individual article on your blog, then moves on to the “Homepage” and afterward to your “About Us” page to find out more information about your company, those three pages are combined into what is called a Session on your website.
So how does this compare to a User and Pageviews? When a person returns a couple of days later and visits five more pages, five more pageviews are recorded in your reporting, there is still only one User, and there are now two Sessions for that User.
What is Bounce Rate?
The Bounce Rate is another very interesting report that is important to know about. A Bounce Rate is the percentage of sessions that have only one single Pageview. The Bounce Rate can give you a quick overview of how your content is performing and which content or which pages deserve extra attention. After all, you want your visitors to get down the rabbit hole, consuming more and more content so they start to see the value of your company and turn into leads.
Don’t forget to put the Bounce Rate into the context of the type of page the Bounce Rate is reporting on. For example, landing pages should have a lower Bounce Rate (because you want people to convert and move to the Thank You page) than maybe your Homepage or a Store Locator.
What is the Acquisition Report in Google Analytics
If you want to figure out how people are finding your website, you will be looking at the Acquisition reports. The Acquisition Report shows you where your visitors are coming from and gives you a report that shows the source, medium, and other acquisition dimensions. You can also see traffic from social networks as well as traffic from custom campaign tags.
When you link your Google Search Console and your Google AdWords accounts to your Google Analytics account, you can also get dedicated reports around paid traffic and organic traffic.
What is a Referral in Google Analytics
A bit in the same line as the Acquisition Reports are the Referral reports. When someone arrives at your website from another third-party webpage, this will be reported as a Referral. In other words, all the sites that are sending you traffic (by domain) are listed here. If you want, you can drill it down to view the “Referral Path,” which gives you an overview of all the individual pages linking to your website.
One of the fundamental ways you need to start tracking all your Inbound Marketing activity (all the campaigns that you’re doing on other places on the internet that will give traffic back to your website) is by using UTM tags.
You can add extra details at the end of a link you share (query parameters), which will then be included in your Acquisition Reports.
UTM stands for “Urchin Tracking Module” (the company that invented them and got bought by Google, turning them into Google Analytics), and they are the things you can see after a URL in your browser. These extra details are always at the end of a URL you’re sharing and include things like “utm_campaign,” “utm_source,” “utm_medium,” “utm_term,” “utm_content” and “utm_id.”
Campaign Name
The “utm_campaign” is one of the three main dimensions that comprise a UTM tag (the others being utm_source and utm_medium). This helps you to identify a specific product promotion or strategic campaign. For example utm_campaign=spring_sale
Source
“utm_source” is the second one important for correctly tagging your URLs. The source helps you to analyze how people found your website, and it tells you where the campaign is coming from. It can help, for example, to identify if someone clicks on a link in a newsletter “utm_source=newsletter,” search engine “utm_source=google,” or any other place where you’re running a campaign. Combined with the next one, “medium,” you can get even more granular insights.
Medium
The last one you need is “utm_medium.” Medium can tell you how the message was communicated to the visitor. For example, “utm_medium=cpc” for a cost-per-click campaign or “utm_medium=affiliate” for an affiliate link.
Term
The “utm_term” and “utm_content” parameters are not mandatory but, if used, can give you a little bit more extra insights. For example, the “utm_term” parameter tracks your keywords during a paid AdWords campaign. You can also use it in your display ad campaigns to identify aspects of your audience. For example, “utm_term=running+shoes”
Content
“utm_content” is finally used when running A/B tests on your ads. It is a useful metric that can pass details about the version people clicked on and as a result, can help you determine which version is more effective than the other. For example “utm_content=logolink” or “utm_content=textlink”
Turning Google Analytics into valuable, actionable information
Being able to collect all of this data is excellent, but at one point, it can become a bit overwhelming.

Do you know exactly what to look for when you read analytics data? Let’s have a look at how we can get the most out of the data and turn it into valuable, actionable information.
Setting up goals for important conversions on your site.
Setting up Google Analytics for the first time is more than just adding the tracker to your website.
To get the most out of your installation, you need to start setting goals. Goals allow you to see how many visitors are taking action and converting into leads, subscribers, and customers. You can see what traffic sources are sending visitors that are most likely to convert and which pages are the most convincing.
So what are Goals exactly? According to Google:
Goals measure how well your site or app fulfills your target objectives. A goal represents a completed activity, called a conversion, that contributes to the success of your business. Examples of goals include making a purchase (for an ecommerce site), completing a game level (for a mobile gaming app), or submitting a contact information form (for a marketing or lead generation site).
Defining goals is a fundamental component of any digital analytics measurement plan. Having properly configured goals allows Analytics to provide you with critical information, such as the number of conversions and the conversion rate for your site or app. Without this information, it’s almost impossible to evaluate the effectiveness of your online business and marketing campaigns.
In other words, goals measure how and when people complete specific actions that you want them to complete.
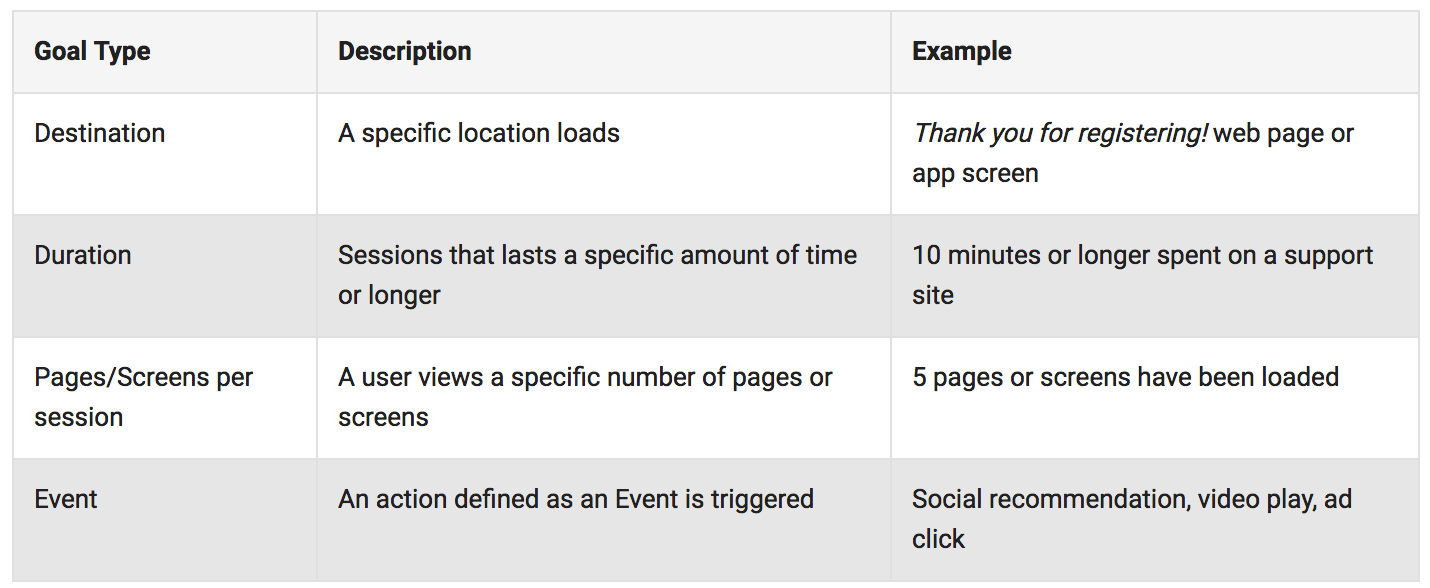
There are four different types of goals you can use to track your content marketing results:
Setting up goals requires that your first figure out what is essential for your business. What goal do you want your visitors to achieve on your site?
Here are a few ideas that might get you started:
- Email list sign-ups
- Webinar registrations
- White paper downloads
- Contact form completions
- Views of a specific page
Don’t go too crazy, though; Google only limits you to 20 per account, which is for a good reason.
Every goal you’re adding will add an extra column in many reports. And too much data will make you lose sight of your main objectives. Start off with one or two, and slowly add more over time when you think they are needed.
To create a new goal, click on “Admin” in the left panel, then in the “View” column, click on Goals. Simply press the “+New Goal button,” and you’re off.
For most of your goals, you want your visitors to end up at a specific destination. After all, when someone converts, they end up on a Thank You page, which is considered a conversion.
Creating redirects to pages like this can quickly be done within a tool like Inbound Rocket by setting up the form type to post and going to a specific page after.
The slug of this page is the destination you need to enter as the Destination URL in your goal, and you’re all good to go.
If needed, you can create a monetary value for the conversion. For example, if you’re setting up the goal for tracking e-commerce transactions, you can specify the goal value to measure the revenue each transaction generates.
Aligning your goals across the Customer Journey to what you can track
Understanding your customers, Customer Journey is crucial if you want to develop strategic marketing tactics that are working. Thankfully Google Analytics offers many powerful functions to measure customer behavior, allowing you to learn from this and respond accordingly.
When you start to understand how your customers behave and what they are looking for, you can develop the content to meet their needs at every stage of the journey.
So now that you know how to set up goals, let’s start aligning your goals with the different phases of the Customer Journey so that you can track your entire conversion funnel.
Topics and reports to think about here are:
Awareness
- Traffic by Channel/Medium
- Traffic by Content Grouping
- Traffic by Author, Topic, Word Count, Date Published
Engagement
- Content Downloads
- Watched Video
- Newsletter Signups
- Email marketing traffic
- Retargeting Trafic
Conversion
- Lead & Contact Forms
- eCommerce Transaction
- Average Order Value
- App Downloads
- Software Trials
- Conversions by Content Type
Retention
- Repeat Revenue
- Content consumption by logged in Users
- Product Reviews
By using the reports, Google Analytics has combined with custom Goals, you can understand your potential customers or leads better and more effectively, steer them in the direction of a satisfied customer, and keep them there.
Using Site Search
One of the easiest ways to help your visitors and keep them on your site is by offering a search bar.
There can also be a time when your site is somehow not optimized enough, and they can’t find what they are looking for; a search bar can help them stay on your site. On top of that, it can also provide valuable insights for you.
Google Analytics can help you tap into this data through its on-site search terms report. By using this report, you can quickly review which keywords people are searching for on your site. You might be targeting the wrong keywords, and your visitors are using different keywords to describe their problems. They are used by comparing what you initially thought to the search terms. You can identify if you’re on the right track.
Or maybe there is a missed opportunity for some new pieces of content you can work on? After all, you know exactly what your customers are searching for, so it can identify additional content you can create that drives more traffic and builds more engagement.
When set up correctly, you can use the information to:
- target the search result pages with specific campaigns (especially if they are converting well)
- create better internal links so that the high-traffic pages allow to deliver of more traffic to lesser-performing pages
- restructure your website to make specific content more accessible to find
- identify topics and keywords you can use in content creation
Setting this up correctly is quite easy in Google Analytics. For setting up goals, click on Admin in the left panel, click View Settings, and then enable Site search Tracking:
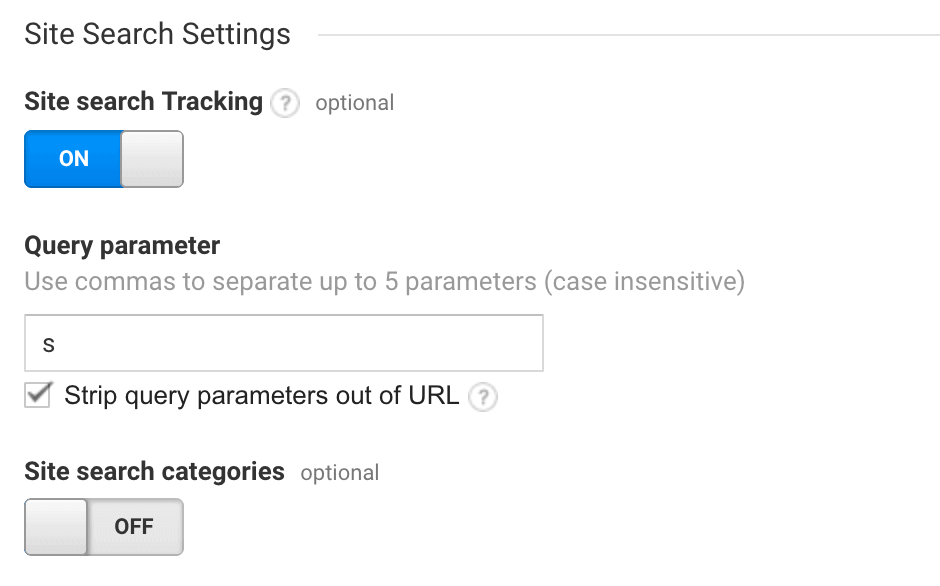
Then, just below the slider, you’ll see a field to enter a Query parameter. The “query parameter” is the letter that appears in the URL to identify a search is happening. (Like the UTM tags). If you’re running WordPress, the default value is “?s=“ so the letter s is what you need to put as the query parameter. Try testing it on your website to see how the URL looks when you search for something.
The last step to do is to check the box “Strip query parameter out of URL” If you don’t select this option, then Google Analytics will start to split up the same searches from different pages. For example, you will begin to see separate listings for mycomany.com/searchresultpage?s=1 and mycompany.com/searchresultpage?s=2.
When you tell GA to “strip query parameters out of URL,” it will just track all those visits together as mycompany.com/searchresultpage while still being able to see the internal searches when viewing your site search data.
After you hit save, you can start seeing the results coming in for your site in Google Analytics under “Behaviour” > “Site Search” > “Search Terms.” If no results are produced while searching on your site, those terms will be shown as no-results: keyword.
Identifying and Filtering Internal Traffic from Google Analytics
Depending on the size of your business, employees browsing your website can cause some severe issues in your Google Analytics reporting. People at your company don’t act like typical visitors on your site and, as a result, alter the metrics that are reported most of the time, like users, sessions and Pageviews.
On top of that, they affect probably the most important metrics for your organization, the conversion rate and attribution reporting in your goals. These can directly impact budgeting, bid strategies for ads, and all sorts of other business decisions.
The best thing for you to do is create a filtered view within Google Analytics so that these internal visits are not messing up your data.
The easiest way to do this is to create an IP address filter in GA. But before you can do that, you first need to figure out what your IP address is, just head over to https://www.whatismyip.com/ or do a Google search for “what is my IP address.”
Now we go to our Google Analytics, choose Admin in the left column, and then from the Account column, select All Filters. Then, click +Add Filter.
You can give your Filter a name like “Internal Traffic Filter.” You can leave the Filter Type as predefined and select Exclude from the Select filter type drop-down. In Select source or destination, “select traffic from the IP addresses” and finally choose “that are equal to”.
In the input box below, you can then enter the IP Address you found earlier, and then the only thing left to do is to the “Apply Filter to Views” section, where you select “All Website Data” and then click the Add button. Hit save, and you’re good to go.
From now on, all visitors internal within your company are completely ignored.
If you still want to be able to make sure that the original data is still saved, the best thing to do before setting up a filter is to create a new view just for this filter. This way you will have the raw data and filtered data available for you. To do that,
- Click “Admin” and navigate to the account and property to which you want to add the view.
- In the VIEW column, click the menu, then click “Create new view.”
- Select either a Web Site or an App.
- Enter a Name (like filtered view). (Use a specific and descriptive name, so you can easily tell what data is in this view when you see the name in a list.)
- Select the Reporting Time Zone. (If your Analytics account is linked to a Google AdWords account, the time zone is automatically set to your AdWords preference, and you won’t see this option.)
See which pages hold people’s attention the longest.
Probably the report that holds the most important clues about which pieces of content your visitors love is the “Average Time on Page” report. In some ways, this is a more accurate measurement of interest than the report on which pages get the most traffic. Especially if you’re running an advertisement campaign going to a specific page or when some of your pages are ranking well and driving in a ton of organic traffic.
To see the “Average Time on Page” and rank your pages according to the time on their page, go to “Reporting” > “Behaviour.” In the expanded menu, click on “Site Content” > “All Pages”.
In the column on the right, you can see the different pages people are visiting, and if you click on “Average Time on Page,” the list will automatically sort for you by time on page.
Another interesting sort you can do on this page as soon as your Goal Data starts to flow in is sorting by Page Value. This will give you insights into which pieces are the most interesting for your visitors and which pieces of content need attention for some updates.
Finding slow loading page to optimize your site speed
The last reporting we want to focus on here is the reporting to identify slow-loading pages. According to Google, most of the websites out there are too slow.
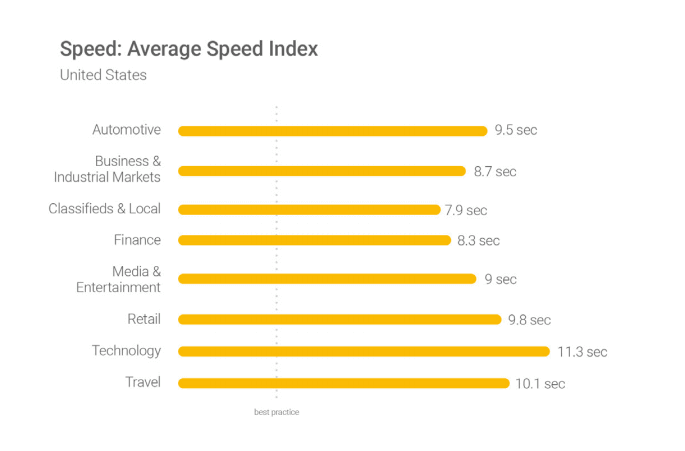
2 seconds is the threshold for e-commerce website acceptability. At Google, we aim for under a half second.” Maile Ohye – Google
In other words, when most websites rank above nine seconds, your visitors are already gone before they have even seen your content.
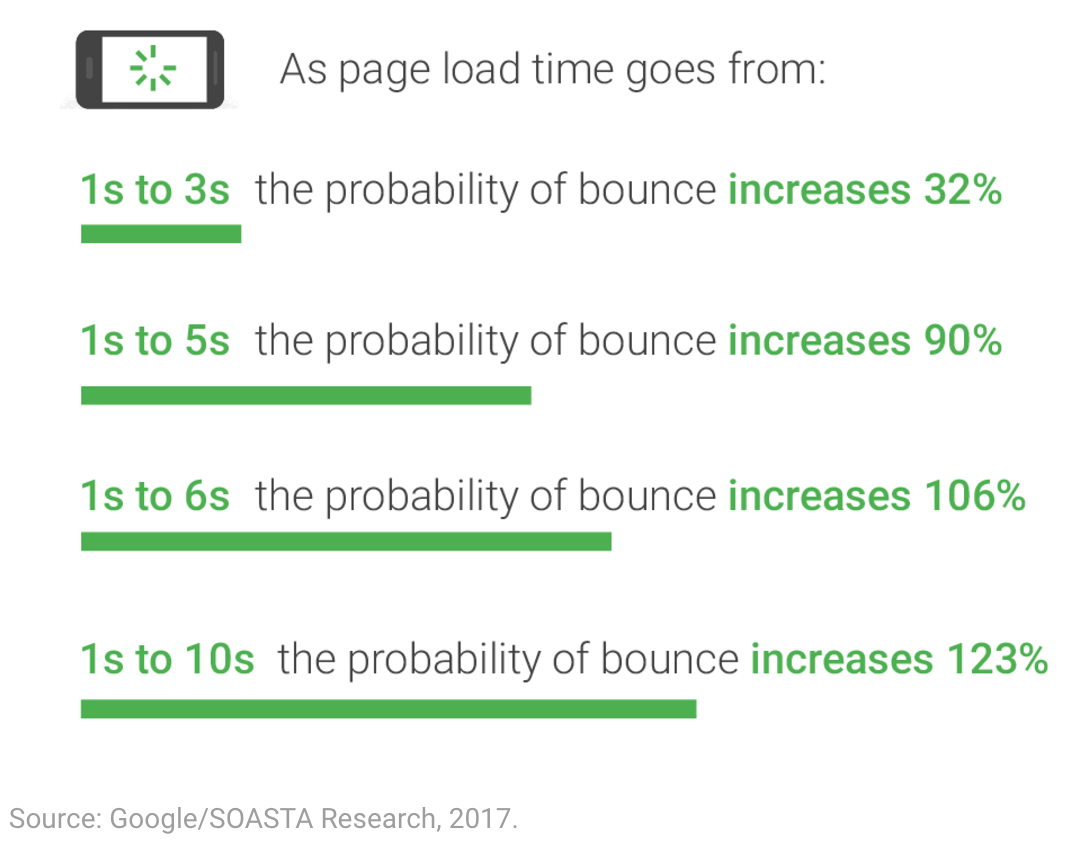
As of July 2018, page speed is a ranking factor in mobile searches.
Thankfully using Google Analytics, you can figure out which specific pages on your site are loading the slowest and need some improvement. This information, combined with which pages are getting the most traffic, should give you enough information to figure out which pages you need to optimize first.
To see the site speed of individual pages, go to “Reporting” > “Behaviour.” In the expanded menu, click on “Site Speed” > “Page Timings.”
This report quickly shows you all of your pages on-site, grouped by page load time. Want to know how you can improve them? Just under “Page Timings” in the left-hand menu, you can find “Speed Suggestions,” showing you some great tips to get started.
Advanced Google Analytics reporting
The final item we want to focus on is a bit more advanced but can give you great insights into finding your most popular content based on the categories and the associated tags.
The way to do that is called Content Grouping. According to Google, Content Grouping is:
Content Grouping lets you group content into a logical structure that reflects how you think about your site or app and then view and compare aggregated metrics by group name in addition to being able to drill down to the individual URL, page title, or screen name. For example, you can see the aggregated number of Pageviews for all pages in a group like Men/Shirts and then drill in to see each URL or page title.
So how to use Content Grouping to determine your most popular content?
Using Content Grouping to determine your popular content
It all starts by navigating to Admin, and then under the View column, you can select “Content Grouping.” Click “+New Content Grouping” and name the first group “Post Categories.”
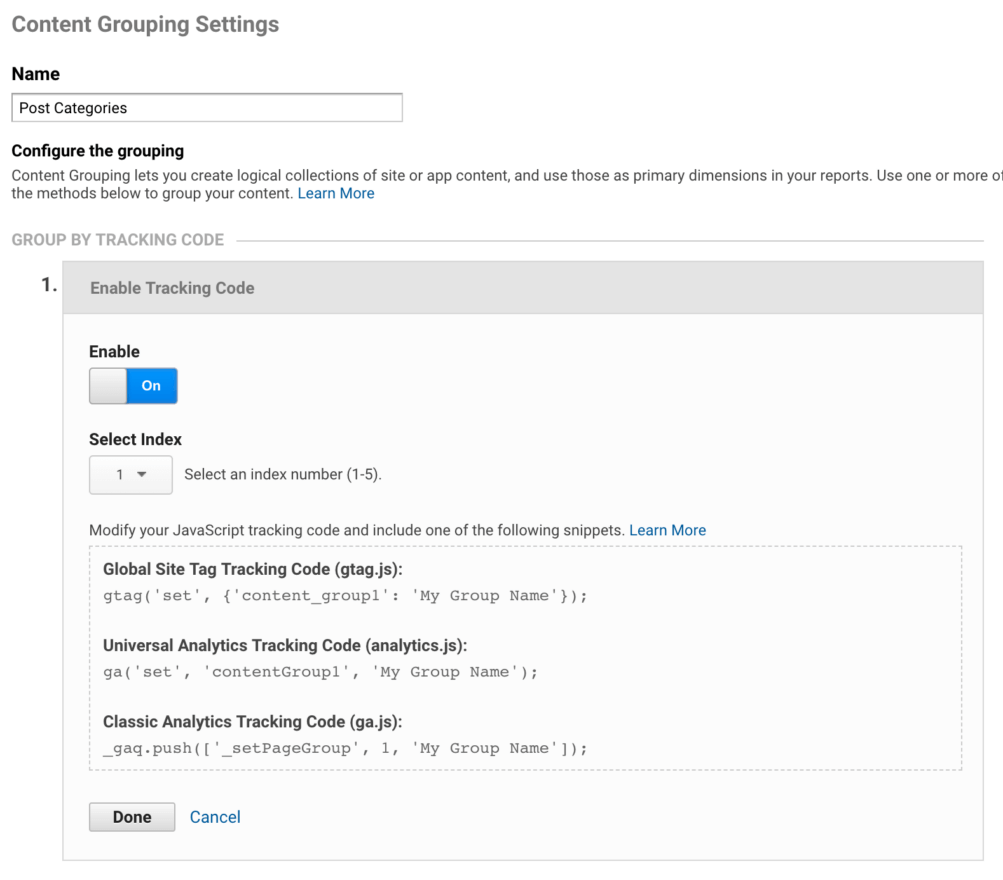
Under “Group by Tracking Code,” click “Enable Tracking Code,” and write down the number under “Select Index” (unless you’ve already done this before for something else, this should be “1”). Click “Done” and then “Save.”
Repeat the same step. Only call it “Post Tags” and write down the index number (probably “2”).
Since we’ve already set up Google Tag Manager in the beginning to enable Google Analytics on our website, we now have to head over to Google Tag Manager.
Choose your Account and click on your “Google Analytics Settings.”
Under the “variable configuration,” you click on “More Settings” > “Content Groups” > “+Add Content Group.”
Enter “1” as the “Index” and then click on the icon on the right of “Content Group.” Hit the plus sign in the top right corner for “New Variable.”
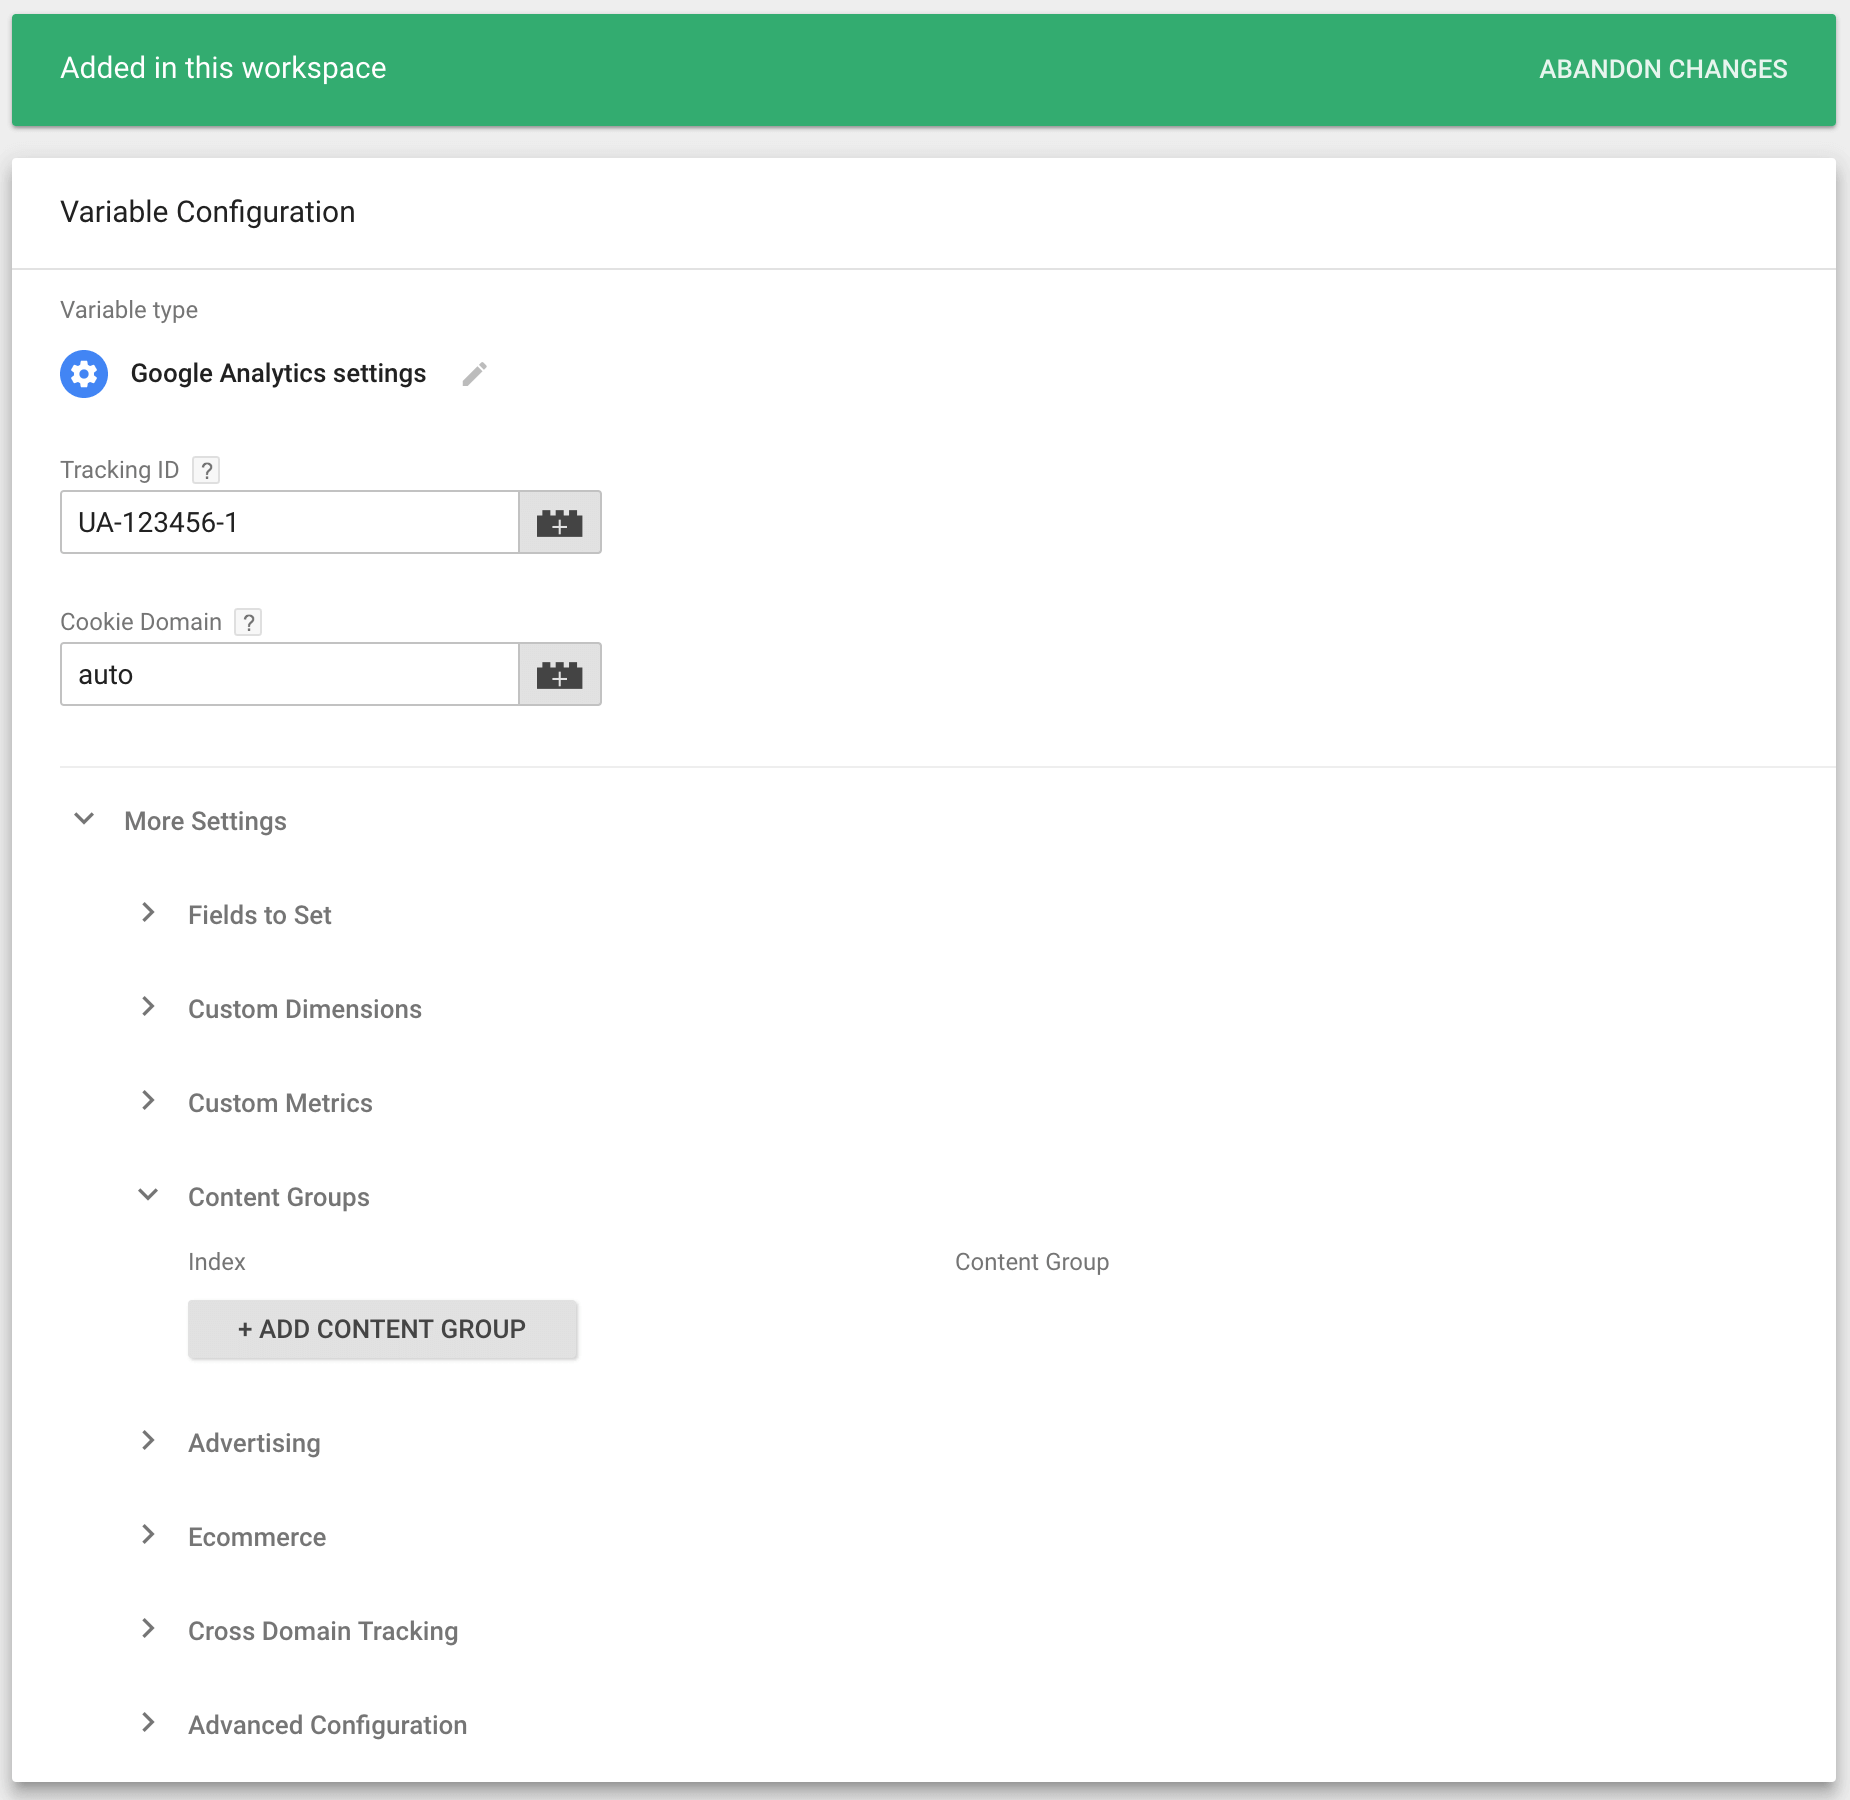
Name the variable “Post Categories” and select “Data Layer Variable” as the “Type,” enter “pageCategory” as the “Data Layer Variable Name,” and click save.
Repeat these steps only this time. Name the variable “Post Tags,” and the name for the “Data Layer Variable” is “pageAttributes”.
After that, click “Continue,” select “All Pages” under “Fire On,” and click “Create Tag” in case that is not selected yet.
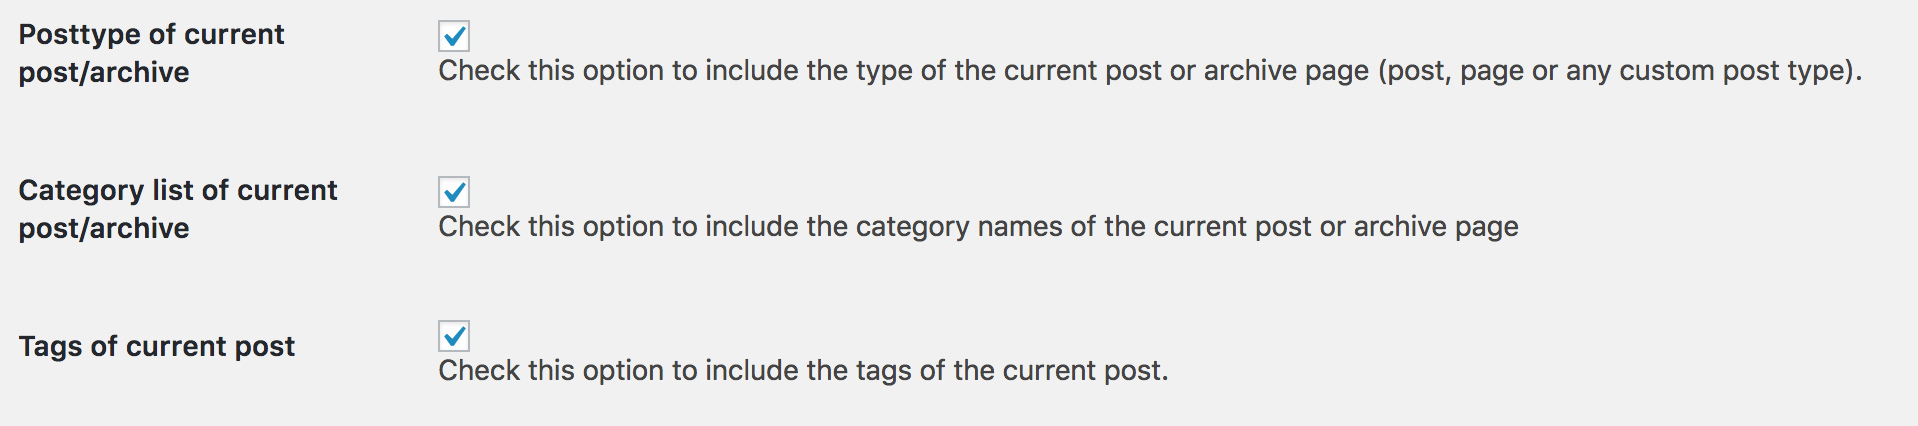
Now we head over to your WordPress site and go to the Google Tag Manager plugin we installed earlier. Under the “Basic data” tab, make sure that both “Category list of current post/archive” and “Tags of current post” are selected.
By doing this, we store extra pieces of information in a Data Layer on your blog posts. The post categories and tags can now be used within Google Tag manager for more advanced data collection and reporting.
The final step will be to publish the changes you made in Google Tag Manager.
From now on in Google Analytics, under “Behaviour” > “Site Content” > “All Pages,” you will have the option to select information from your content groupings.
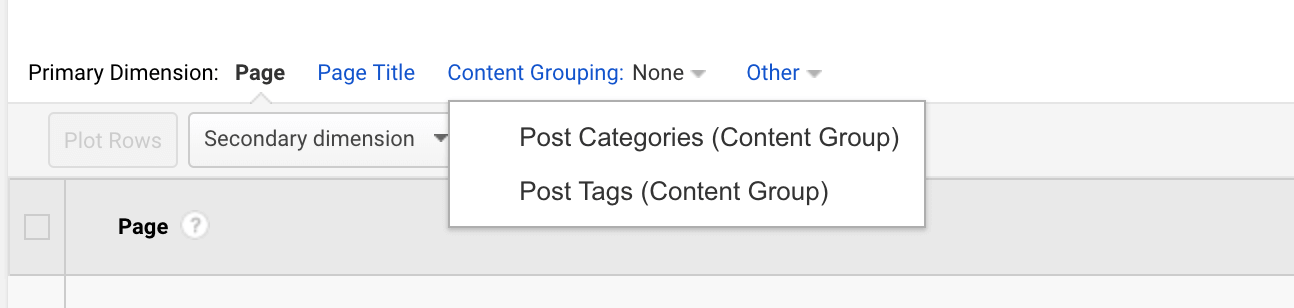
In other words, you can now figure out what are the most visited content categories and tags that you’re visitors are finding most interesting. It allows you to understand how certain content is performing based on the categories and tags.
Although it is a bit of a top-level view, it can be powerful to understand your top-performing content quickly. And as a result, it can help you focus on the topics your visitors seem to love most.
Google Analytics is an enormous data wonder, and it holds lots of vital data about your website and its performance. Best of all, it offers all this data to you for free.
As you can see, it all starts with correct implementation, though, and from there, there are many different ways to evaluate the performance of your content marketing.
Using standard reports like the number of page views is not enough if you truly want to move your business forward.
If you learn what questions you need to ask for your business, you can start evaluating your content marketing efforts.
After all, if you don’t measure your content marketing strategy, you don’t know what is and what isn’t working.
How do you use Google Analytics to improve your (content) marketing strategy? Drop us a reaction in the comments below; we’d love to hear from you.
This entry was posted in Content Marketing. Bookmark the permalink.
Want to learn more about growing your business through digital marketing? Looking to take your business to the next level? Let’s talk!
If you want you can easily unsubscribe with a single click at any time.
[…] Table of Contents [hide] […]
[…] ways to measure the results of a marketing campaign. But the most straightforward one is to make use of UTM tags and […]
Google Analytics and all of its reports can be difficult.
Properly utilizing the tools within Google Analytics to inform your business decisions can be even more challenging.
Thanks to your post, it will help a lot of people!
[…] we’ve already discussed UTM tags in-depth in another post and how to set up Google Analytics on your website. The idea here is to create a custom URL for Quora links so you can track the click-throughs to […]
Great post
Thanks a lot! Glad you liked it 🙂
[…] not. Avoid making decisions based on riddles or opinions – the data is all that matters. Use Google Analytics to see how your content is performing on your website and if you post content on social media, […]
[…] a basic implementation will already get you some pretty valuable information. If you’re using UTM tags in the links that you’re using in your social content, you can even drill down to which […]